On June 12th, I posted a simple challenge on the 0x00sec forum. It’s aimed at beginners who are just starting to explore programming and reverse engineering. You can find it in the ReverseMe section above.
Today, let’s turn that challenge into a practical exercise to sharpen some foundational reversing skills. Along the way, I’ll introduce you to Ghidra, a pretty slick reverse engineering tool. The challenge itself can be solved in minutes, but in today’s walkthrough, I’ll take the time to go through each step, disassembling and trying to understand every function.
The obfuscation is minimal, so we won’t be wasting time. Every call and jmp will help us learn more about the challenge and its core. Plus, it’s a great chance to introduce you to Ghidra and share a few programming tricks and techniques along the way.
What to expect: To get started, you’ll need the basics a general understanding of programming principles and a bit of familiarity with assembly. Just enough to know what registers, the stack, the heap, and pointers are. Don’t worry, I’ll break things down as we go.
We’ll load the binary into Ghidra and use its features to dissect the challenge step by step. From navigating the disassembly and decompiled code to pinpointing key functions, we’ll piece together how the program works. With a bit of logic and some programming know-how, we’ll unravel exactly what the binary is doing.
By the end of this, you won’t just have solved the challenge you’ll have taken your first steps into thinking like a reverser.
The first clue? It’s right in the challenge title: Cipher. That tells us encryption is involved. So our first step is to gather as much info about the binary as possible. While not always mandatory, getting a broad overview helps us understand its behavior, structure, and any quirks. Think of this as reconnaissance it sets the stage for everything that follows.
We’ll start by extracting a hash of the binary and running it through scanners like VirusTotal. This can reveal if it’s been flagged before or if any signatures match known malware. Hey, even I don’t trust myself ;)
$ file foo.elf
foo.elf: ELF 64-bit LSB pie executable, x86-64, version 1 (SYSV), dynamically linked, interpreter /lib64/ld-linux-x86-64.so.2, BuildID[sha1]=b42d557c4fb661b1a1ded313a1075f73c99f9aa1, for GNU/Linux 3.2.0, stripped
Right away, we know:
- It’s an ELF binary (no shit!)
- It’s 64-bit and dynamically linked, meaning it relies on external libraries that load at runtime (remember this)
- It’s “stripped,” which tells us the debugging information and symbols have been removed, making reverse engineering a little trickier. Don’t worry about it though!
Let’s see what strings are embedded in the binary:
[Strings]
nth paddr      vaddr      len size section type  string
―――――――――――――――――――――――――――――――――――――――――――――――――――――――
0   0x00002004 0x00002004 25  26   .rodata ascii Welcome to the challenge!
1   0x0000201e 0x0000201e 20  21   .rodata ascii Enter the password:
The output confirms a couple of key things:
- There’s a user prompt asking for a password, which hints at the program’s purpose.
- Strings like “Welcome to the challenge!” suggest the binary has a specific interaction flow.
At this point, we can hypothesize (like I ain’t the author) that the binary will verify a password against some internal logic or encryption scheme.
And here are a few symbols that’ll play a role later in our reversing. For now, don’t worry about it, but always keep an eye on functions like strcpy, puts, and malloc:
[Symbols]
nth paddr      vaddr      bind   type   size lib name                            demangled
――――――――――――――――――――――――――――――――――――――――――――――――――――――――――――――――――――――――――――――――――――――――――
1   0x000010c0 0x000010c0 GLOBAL FUNC   16       imp.free
2   ---------- ---------- WEAK   NOTYPE 16       imp._ITM_deregisterTMCloneTable
3   0x000010d0 0x000010d0 GLOBAL FUNC   16       imp.strcpy
4   0x000010e0 0x000010e0 GLOBAL FUNC   16       imp.puts
5   0x000010f0 0x000010f0 GLOBAL FUNC   16       imp.strlen
6   0x00001100 0x00001100 GLOBAL FUNC   16       imp.printf
7   0x00001110 0x00001110 GLOBAL FUNC   16       imp.strcspn
8   ---------- ---------- GLOBAL FUNC   16       imp.__libc_start_main
9   ---------- ---------- WEAK   NOTYPE 16       imp.__gmon_start__
10  0x00001120 0x00001120 GLOBAL FUNC   16       imp.malloc
11  0x00001130 0x00001130 GLOBAL FUNC   16       imp.getline
12  ---------- ---------- WEAK   NOTYPE 16       imp._ITM_registerTMCloneTable
13  ---------- ---------- WEAK   FUNC   16       imp.__cxa_finalize
Now, what does this tell us?
There’s clearly a section of code responsible for comparing the input password against a stored or computed value. This comparison is our next target. The goal is to find where the program performs this validation, understand its logic, and reverse it to extract the correct password.
Since running the binary didn’t give us much information beyond confirming the password prompt, we’ll shift focus to deeper analysis. Here’s the plan:
We’ll load the program and search for validation logic. Identify the password-check function that likely compares the input against a value, and trace the flow of execution following the challenge’s logic step by step, we’ll understand how it processes and validates the input.
Ghidra 101
We chose Ghidra for its popularity and feature set. We imported the foo.elf binary into Ghidra for analysis, following standard import procedures: create a new project, import the binary file, click the dragon icon, and at the end you’ll get an “Import results summary” make sure to click yes. We don’t need any extra things beyond the defaults.
We navigated to the functions folder, where functions are typically labeled as FUN_00101170 due to the absence of symbol information caused by the stripped binary. While we can adjust these labels later, our analysis began by examining the entry function.
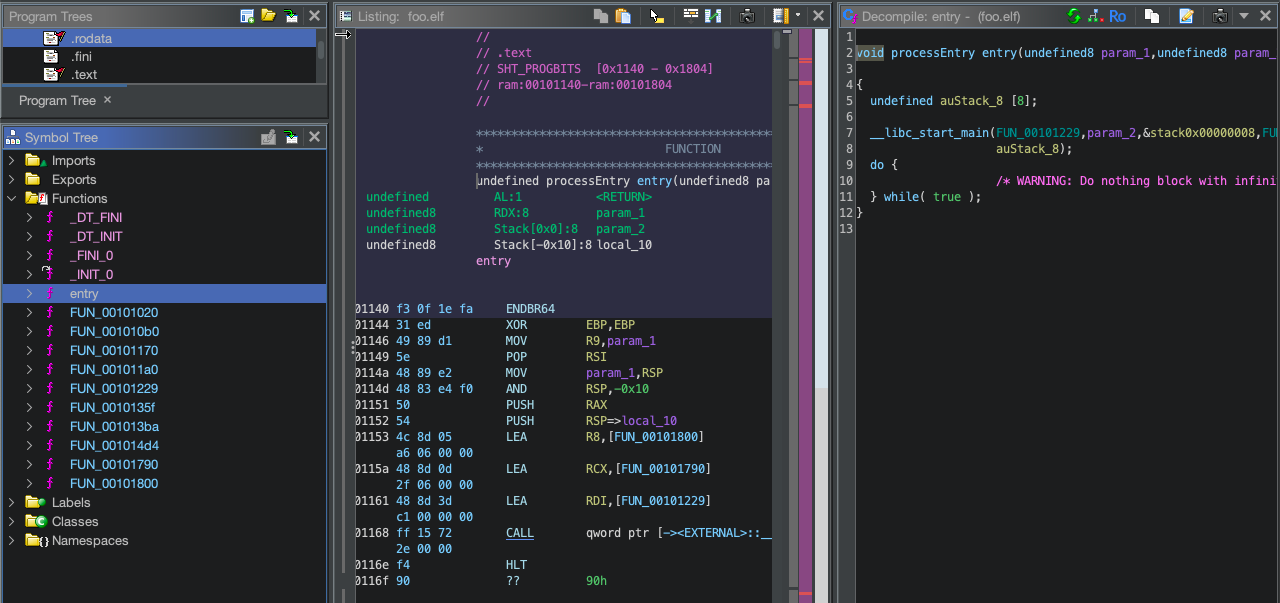
This marks the starting point of program execution. It got initial code responsible for setting up the program’s env, initializing variables, and executing any necessary setup tasks before the main logic unfolds. Plus, it features important control flow such as branching instructions, function calls, and conditionals, guiding the program’s behavior throughout execution.
In the middle section of Ghidra’s interface, you’ll find the assembly code of the binary. Clicking on a line of code displays the address of the current line. To locate the base address of the program, navigate to the top address within the “Program Tree” window.
Also, Ghidra shows the ELF header details, including key metadata such as the ELF magic number (7F 45 4C 46 or “ELF”) and architecture information. For instance, the e_machine field confirms that this binary is built for the x86-64 architecture (3Eh), and the e_entry field provides the entry point of the program, located at address 0x1140. This is where the program’s execution begins.
In the next sections, the numbers 03 00 represent the hexadecimal representation of the data. For instance, if a value like 3h is stored, it would be represented as 03 00 in hexadecimal format.
        0010122d 53              PUSH       RBX
        0010122e 48 83 ec 40     SUB        RSP,0x40
        00101232 48 c7 44        MOV        qword ptr [RSP + local_10],0x14
Adjacent to the bytes, you’ll find the corresponding assembly instructions, such as PUSH, along with their operands. Some lines may also reference functions and subfunctions. Keeping track of these details and references is essential during the analysis process.
As we dive into the disassembler, we notice a few key functions: FUN_00101229, FUN_00101790, and FUN_00101800. Here’s a snippet of the processEntry function that kicks off our exploration:
void processEntry(undefined8 param_1, undefined8 param_2)
{
  undefined auStack_8 [8];

  __libc_start_main(FUN_00101229, param_2, &stack0x00000008, FUN_00101790, FUN_00101800, param_1, auStack_8);
  do {
  } while (true);
}
So, remember how we only saw two strings: “Welcome to the challenge!” and “Enter the password:”
This tells us something important any strings related to success (like a congratulatory message) or failure (like additional error details) aren’t showing up in the initial strings output.
What does this mean?
It’s a strong hint that the challenge logic might not rely solely on pre-defined, static strings. Instead, the binary could be using dynamic generation for its outputs or might rely on external resources or encoded data. So, if the strings aren’t directly embedded or visible, the binary could:
Construct messages at runtime. Or, instead of revealing the correct password or success strings directly, the binary might manipulate the control flow in more subtle ways.
This leaves us with an important task: Find the logic. Somewhere in the binary, there’s a point where it branches based on whether the input password is correct or not. That decision point is the key to reversing the program’s challenge.
To save time, we know the binary is reading user input. This is typically done using functions like scanf(), fgets(), getchar(), and getline(). In Ghidra, we can identify these functions by searching for their calls within the disassembly or by following references in the control flow.
Now, why did we focus on getline() specifically? Well, when we examined the symbols earlier, we saw getline() pop up. That’s a clear signal that it’s being used for user input. With this in mind, we know that the binary is relying on dynamic input handling rather than something simpler like scanf(), which is much more static.
Alright, let’s jump into the disassembly. We identified where getline() was being used in the disassembly earlier, and traced it to FUN_00101229.
Let’s focus on the entry point of this function. To make the function easier to understand, I renamed some of the variables with more descriptive names.
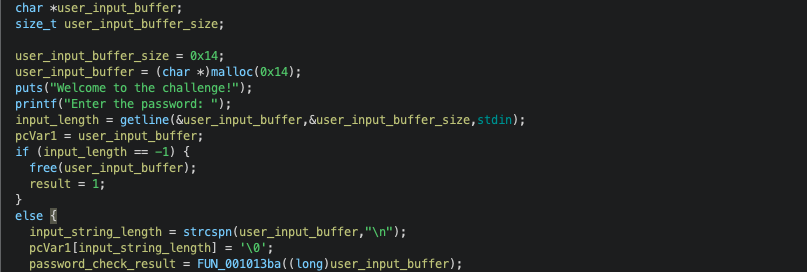
As we can see here, after displaying a welcome message and prompting the user for a password, it reads the input and processes it. If the input is valid, it calls FUN_001013ba.
If it returns 0, an error message is displayed; otherwise, FUN_001014d4 is invoked, likely to handle the correct password scenario.
So this is simple we can just follow where the validation logic leads us. The function FUN_00101229 performs a basic check on the user input, and depending on the result, it either shows a message or calls another function. Specifically, the logic branches at the call to FUN_001013ba, which is where the input validation occurs.
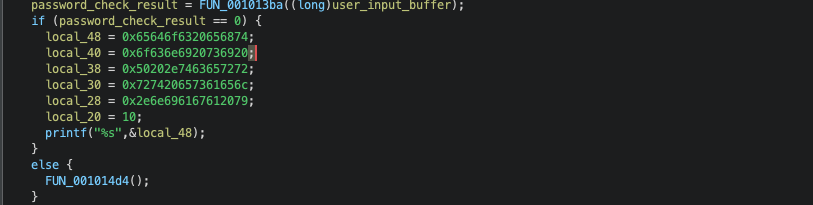
If FUN_001013ba returns 0, the function proceeds to print what appears to be a coded message using variables like local_48, local_40, etc. These variables store hexadecimal representations of ASCII characters, which spell out “the code is incorrect. Please try again”.
On the other hand, if FUN_001013ba does not return 0, FUN_001014d4 is called, which handles successful input (i.e., when the password is correct).
So at this point, we’ve got two functions FUN_001014d4 and FUN_001013ba that play a part in the main logic of our challenge. Let’s follow FUN_001013ba and break it down, and we can come back later for FUN_001014d4.
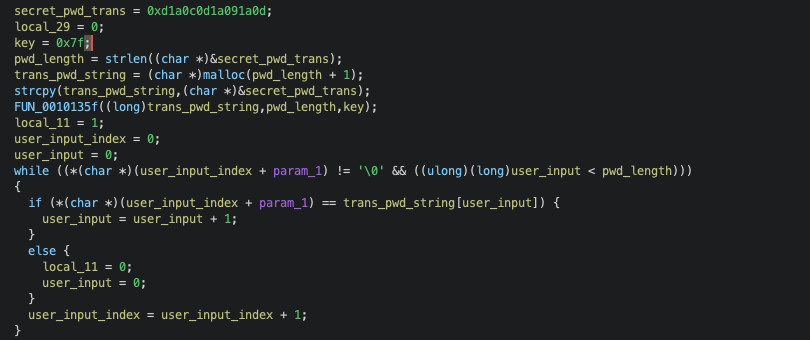
Boom! There it is. The secret password is sitting right there in local_31 I’ve renamed it to secret_pwd for clarity. It’s stored as a 64-bit value: 0xd1a0c0d1a091a0d. Now, this isn’t the actual password yet it’s encoded. But finding this hardcoded value is like striking gold in reverse engineering. It tells us the password isn’t randomly generated or pulled from external sources; it’s baked right into the binary.
Since secret_pwd is a 64-bit value that represents a string, its length is calculated using strlen() on secret_pwd. The result of this call is stored in pwd_length.
Next, memory is allocated for a new string local_28 (renamed to trans_pwd_str) to hold the password in a form that can be manipulated. This string is a copy of the content in secret_pwd, but it’s still not in a readable or final state. The program then calls another function, FUN_0010135f (renamed to apply), to perform a transformation or encoding on trans_pwd_str.
The transformation involves XORing each character of the password string with a key, applying a basic cipher. And here’s where it gets interesting the XOR key is sitting in local_12, set to 0x7f. This is classic! XOR with 0x7f is a common obfuscation technique because it flips specific bits in a predictable way. The beauty of XOR is that it’s its own inverse XOR something with a key, then XOR the result with the same key, and you get back the original. So 0x7f is both our encryption and decryption key.
If you analyze the function apply, you’ll see it iterates over the length of the password, applying the XOR operation with the 0x7f key to each character in trans_pwd_str. This confirms that 0x7f is indeed the key used to obfuscate the password.
After the transformation, the function sets local_11 (renamed to password_is_valid) to 1, initially assuming that the password is correct. Then, it initializes two variables: local_c (renamed to input_index) and local_10 (renamed to match_count).
input_index is used to iterate through the user’s input character by character, while match_count keeps track of how many consecutive characters from the user’s input match with the transformed password meaning it’s doing a character-by-character comparison.
Alright, time for the fun part let’s actually decode this thing! We’ve got our encoded password 0xd1a0c0d1a091a0d and our key 0x7f. Since XOR is reversible, we just need to XOR each byte of the password with 0x7f.
Let me break this down. First, we need to convert our 64-bit value into individual bytes, then XOR each one:
# Our encoded password as a 64-bit value
password_hex = 0xd1a0c0d1a091a0d
key = 0x7f

# Convert to bytes
password_bytes = []
temp = password_hex
while temp > 0:
    password_bytes.append(temp & 0xff)
    temp >>= 8

# XOR each byte with the key and convert to ASCII
decoded_password = ""
for byte in password_bytes:
    if byte != 0:  # Skip null bytes
        decoded_char = byte ^ key
        decoded_password += chr(decoded_char)

print(f"Decoded password: {decoded_password}")
Bingo! The password reveals itself. This is the moment where everything clicks you see how the obfuscation works, how the XOR cipher transforms readable text into seemingly random hex values, and how reversing that process gives us back the original password.
Hey, but before we wrap up, let’s revisit FUN_001014d4. Remember, this function is supposed to hold the congratulation message. But how does it work? Let’s take a look.
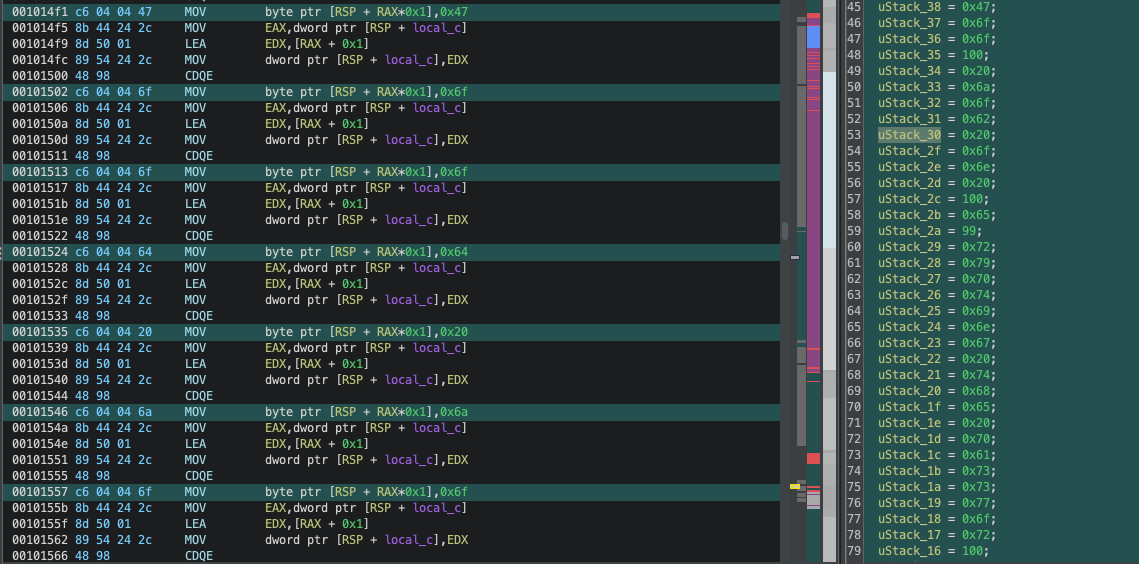
So what you’re looking at here is a function that constructs strings on the stack at runtime, obscuring string data within the program. They aren’t stored in plain text in the binary but are dynamically built when the function executes.
This pattern of constructing strings on the stack at runtime
        001014dc c7 44 24        MOV        dword ptr [RSP + local_c],0x0
        001014e4 8b 44 24 2c     MOV        EAX,dword ptr [RSP + local_c]
        001014eb 89 54 24 2c     MOV        dword ptr [RSP + local_c],EDX
        001014f1 c6 04 04 47     MOV        byte ptr [RSP + RAX*0x1],0x47
        001014f5 8b 44 24 2c     MOV        EAX,dword ptr [RSP + local_c]
        001014fc 89 54 24 2c     MOV        dword ptr [RSP + local_c],EDX
        00101502 c6 04 04 6f     MOV        byte ptr [RSP + RAX*0x1],0x6f
        00101506 8b 44 24 2c     MOV        EAX,dword ptr [RSP + local_c]
The binary constructs a string byte-by-byte on the stack, building each character one at a time. This approach prevents static analysis tools, such as strings, from detecting them since the strings are generated dynamically during execution.
To analyze this in Ghidra, update the stack variable type from undefined to char[38] for clarity:
char message[38] = "Good job on decrypting the password!\n";
This reveals the runtime-generated string directly in the decompiler output. The manual construction obfuscates the string data, making it harder to extract without executing or reversing the binary.
Putting It All Together
The challenge works by prompting the user for a password and comparing it against a pre-defined, obfuscated password. The program doesn’t directly store the password as a simple string but instead stores it as a 64-bit value, 0xd1a0c0d1a091a0d. This value is then XORed with the key 0x7f, transforming the password into an unreadable format.
When the user enters a password, it goes through a comparison process where each byte of the input is XORed with 0x7f and compared to the corresponding byte of the transformed password. If the input matches, the program proceeds to print a congratulatory message. If it doesn’t, it displays the error message.
The congratulatory message itself is also obscured. Instead of storing it as a plain string, the program constructs it on the stack at runtime, byte-by-byte. Each character of the message is loaded into the stack. When the function FUN_001014d4 is called, it uses printf to print the message, but the message only exists on the stack during execution.
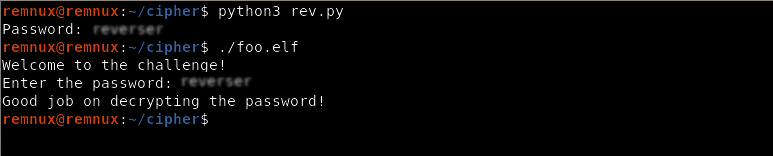
The key to solving this challenge is understanding that the password is XORed with 0x7f. Once you reverse that XOR operation, you can reveal the original password. After that, entering the correct password allows the program to print the congratulatory message.
Keep in mind: not all information is available statically some strings and behaviors only appear when running the binary. Use dynamic analysis (gdb or ltrace) to catch runtime behaviors.
Final Thoughts
In terms of reversing, the most important breakthrough is realizing that the program was using XOR on the password, and for fun, that it’s dynamically building the success message. Once you figure that out, it’s just a matter of reversing the XOR operation on the password to retrieve it and completing the challenge.
And just like that, you could solve this challenge in a minute it’s a simple one, so the solution is somewhat obvious once you know what to look for. However, it’s always important to take your time to understand the binary at hand. The reason I followed this methodical approach using Ghidra and jumped between functions was to familiarize you with the tool while also introducing you to some techniques that will help you feel comfortable with reverse engineering.
RE it’s in understanding the thought process, the tools, and the techniques that make you a better reverser. Each binary teaches you something new, whether it’s a new obfuscation technique, a different way of hiding strings, or just a clever use of programming concepts.
Until next time, keep reversing!